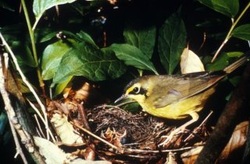
Can you guess this bird? This bird’s migration journey will take it to the Gulf Coast this week. Can you name it? Photo by: USFWS. From the National Audubon Society

Scientists have discovered world's largest chicken dinner!
Wrap your head around this image: A 30-foot long chicken weighing over a ton. Paleontologists in China have discovered fossils for a species of dinosaur that is the largest feathered animal ever to have existed. They say three largely complete fossils of the Yutyrannus huali (a name meaning "beautiful feathered tyrant") are the first "direct evidence for the presence of extensively feathered gigantic dinosaurs." Scientists said the animal's feathers were similar to the fuzzy down of chicks and probably served as insulation. Their size, and the length of the feathers, make it unlikely they could fly. (From MSN Now)
Wrap your head around this image: A 30-foot long chicken weighing over a ton. Paleontologists in China have discovered fossils for a species of dinosaur that is the largest feathered animal ever to have existed. They say three largely complete fossils of the Yutyrannus huali (a name meaning "beautiful feathered tyrant") are the first "direct evidence for the presence of extensively feathered gigantic dinosaurs." Scientists said the animal's feathers were similar to the fuzzy down of chicks and probably served as insulation. Their size, and the length of the feathers, make it unlikely they could fly. (From MSN Now)
BackYard Projects
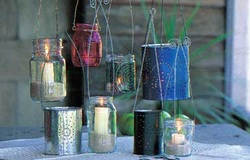
Tin-can & Glass-jar Lights
Set your backyard, porch or terrace aglow with theses fun lights.
Outdoor lighting doesn't have to be complicated or expensive to install. All it takes are some everyday materials and a little imagination to set your backyard, porch or terrace aglow. Below you'll find instruction on how to make both tin-can lights and glass-jar lights.
Tin-Can Lights Step 1: Make a pattern of holes on paper to wrap around your can by using a photocopier to enlarge one of the three designs shown at right. You can also cut a piece of paper to size and copy a design onto it freehand. Or make your own original pattern!
Step 2: To copy the circle designs from the patterns, use a compass and pencil to draw concentric circles and mark equidistant points around the outer circumference. Draw lines from the center to these points to divide the circle into even sectors. A dot at each intersection indicates where a hole is to be made.
Step 3: For the diamond design, draw a small diamond shape made of two equilateral triangles, and enclose this in two proportionately larger triangles. Add dots to the outlines at evenly spaced intervals to indicate holes.
Step 4: Tape the paper pattern to the can. Place one end of the dowel lengthwise in the vise; slip can over the other end.
Step 5: At each dot on the pattern, make a divot in the can with a large nail (this will help guide the drill), and then enlarge with a 1/8-in. drill bit. Make holes for the handles near the top of the can in the same way.
Step 6: Make a handle by bending a 20-inch length of wire at its midpoint, then bending small hooks at each end to attach to can. Twist other end into a small loop for hanging. Paint cans if desired (avoid water-based or latex paints). Insert a candle.
Glass-Jar Lights Step 1: Measure circumference of jar neck, add 3 in., and cut a piece of tie wire to this length. Bend the wire around the jar neck to form a loose circle, and use pliers to hook the two ends securely together. With a screwdriver, twist the wire to form two eye loops on opposite sides of the jar.
Step 2: For the hanger, cut another piece of wire, 3 ft. long. At its midpoint, use pliers to twist a loop for hanging.
Step 3: Thread 1 in. of each end of the hanger wire through the eye loops; secure the wire by twisting the ends back on themselves.
Step 4: If desired, embellish jar with glass paints, following the manufacturer’s instructions. Make a bed of sand 2 inches deep in each jar, and insert a candle.
(From: Birds & Bloom Magazine)
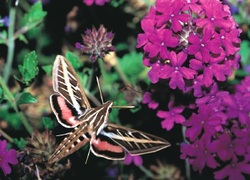
Raising Caterpillars - See sphinx caterpillars up close and personal. By Kris Wetherbee, Oakland, Oregon
If you want to see the metamorphosis of the sphinx moth in action, find a caterpillar before it pupates and watch the magic unfold inside a glass jar. Sphinx moths typically pupate in loose soil (smaller species on the surface in leaf litter), so it's best to provide about 3 inches of soil and dry leaves in the jar. Include twigs and freshly cut leaves from its host plant, and continue to offer fresh leaves until the caterpillar pupates. (Don't forget to add holes in the jar lid so the caterpillar can breathe.) Late generation caterpillars that overwinter in the pupal stage will need a cold period, which can be provided by placing the jar in an unheated garage or a protected area on the north side of a building. After most of the trees start to leaf out in early spring, bring the jar inside to watch the winged adult emerge. Be sure to set the sphinx moth free within a day of emerging. (From: Birds & Blooms Magazine)
If you want to see the metamorphosis of the sphinx moth in action, find a caterpillar before it pupates and watch the magic unfold inside a glass jar. Sphinx moths typically pupate in loose soil (smaller species on the surface in leaf litter), so it's best to provide about 3 inches of soil and dry leaves in the jar. Include twigs and freshly cut leaves from its host plant, and continue to offer fresh leaves until the caterpillar pupates. (Don't forget to add holes in the jar lid so the caterpillar can breathe.) Late generation caterpillars that overwinter in the pupal stage will need a cold period, which can be provided by placing the jar in an unheated garage or a protected area on the north side of a building. After most of the trees start to leaf out in early spring, bring the jar inside to watch the winged adult emerge. Be sure to set the sphinx moth free within a day of emerging. (From: Birds & Blooms Magazine)
